TACTICA: Eversor Assassin


“Fear me, for I am your apocalypse.” — Dictatus Eversor
In previous articles, I’ve referred to the Eversor as the Officio Assassinorum’s Sword. It is an apt metaphor; he is a weapon of brutal and ruthless destruction. The Eversor is deployed when heresy and corruption takes control of an entire regime and the eradication of a single leader would be useless. He is a cruel and perfectly efficient killing machine and he specializes in leaving havoc and terror in his wake to deliver the message of Imperial retribution.
EVERSOR 101.
For the points, the Eversor is the most effective close combat model that an Imperial player can buy. He combines Infiltrate, an 18″ assault range and up to 10 Power Weapon attacks for a first turn charge that has a reasonable chance of bringing down any model in the game.
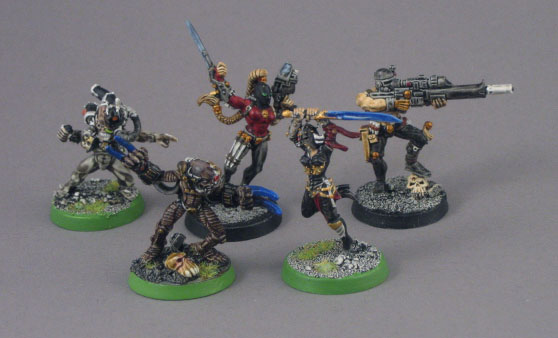
The Temple Eversor Assassin is armed with an Executioner Pistol, a Neuro Gauntlet, Power Weapon, Meltabombs and enough Combat Drugs to kill a Carnifex.
The Executioner Pistol is a great weapon that is often forgotten in the rush to assault. The Fast Shot ability allows the Eversor to shoot the pistol twice and charge. The weapon is particularly effective against high Toughness models because it always wounds on a 4+.
Note: The Eversor is the only Imperial Assassin armed with a close combat weapon and a pistol; affording him the +1 Attack bonus for two one-handed weapons. So unlike his brethren, he has a base Attack characteristic of 4. On the charge he is particularly devastating with D6+4 attacks!
In close combat the Eversor may choose between a Neuro-Gauntlet (a Power Weapon that wounds on a 4+ regardless of Toughness) and a Power Weapon. Which weapon he uses depends on the Toughness of the model. This means the Eversor can never wound on worse than a 4+. This is very handy against T5+ models (he’s a Wraithlords worst nightmare). The Power Weapon is used on models with T3 or worse which prevents the Eversor’s S4 from going to waste.
Combat Drugs allow the Eversor to make a 12″ Assault move and give him D6 extra Attacks when he charges (instead of the normal +1). Combined with the Infiltrate ability, the Eversor is capable of making first turn assaults reliably (putting his 5 to 10 Power Weapon Attacks to good use).
Dirty Trick #1: The Eversor is the only Assassin armed with Meltabombs. When used with Combat Drugs and the first turn, the Eversor is able assault a high AV vehicle and hit with Meltabombs automatically. This is very effective against opponents that use expensive transports (loaded with more expensive units). Nothing is more demoralizing for an opponent than to have his Landraider destroyed (and the expensive occupants Entangled and/or killed) before his first turn. For you Mathhammer fans out there, the Eversor has a 31% chance of destroying a stationary Landraider — not too shabby.
WHEN TO USE AN EVERSOR.
Unlike the other Imperial Assassins, the Eversor should never work alone. In most games he can take on any squad for one turn, but can easily be brought down by large numbers and hidden Powerfists. To keep him in play, you must support him with another unit as quickly as possible. I recommend an Infiltrating unit (like Deathcult Assassins) or a fast unit (like Assault Marines or Seraphim). The sooner you can get another unit in close combat the higher the chance that your Eversor will survive.
The best time to use an Eversor is when you need your opponent focusing on his deployment zone. I combine him with strong shooting armies. This forces my opponent to choose to focus his assault element on moving forward to eliminate my gun line or to take care of my Assassins in his deployment zone. Used properly and the Eversor can give you one or two more rounds of shooting against a fast-moving assault army.
HOW TO USE AN EVERSOR.
I try to place my Eversor 12.0000001″ from the unit I wish to assault in a location that blocks line of sight to as much of my opponent’s army as possible. This helps me in two ways when my opponent gets the first turn: a) it minimizes the chance that my opponent will kill my Assassin during his shooting phase, and b) it prevents the unit I wish to assault from assaulting me (few units have the ability to assault more than 12″).
If I have more than one unit Infiltrating (I usually use 3-6 Death Cult Assassins with the Eversor), then I make sure that there are models a bit closer to my enemy. Never miss an opportunity to force your opponent to test for Target Priority.
In most cases, you want your Eversor to assault an Infantry unit (preferably one without a Powerfist). From time to time I will use him against a vehicle, but only if the trade is worth it (e.g., a Landraider with a Terminator Command Squad is worth the trade). He needs the protection of close combat; an Eversor caught standing next to the smoldering ruins of a destroyed vehicle is a dead Eversor.
You need to establish your goal before assaulting. Do you want to tie up the unit? Or do you want to try kill as many as possible (and try to Sweeping Advance them)? Ideally you’ve made this decision before you deploy the model.
If you wish to tie up a unit (a good decision if you want to keep your Eversor alive until reinforcements arrive), then assault the enemy on the extreme edge of the unit. Make sure that you are in base contact with only one model and try to limit the number of models in the Eversor’s kill zone. Unless you roll poorly, you should be able to wipe the kill zone at Initiative 5. Your opponent can’t attack back and since you don’t outnumber your opponent (yet!), he’s unlikely to fail his Morale test for losing the close combat. Since you Pile In first, try to position your Eversor in a location that minimizes the number of enemy models that can reach him. This works really well if your enemy falls back and you consolidate into him.
I use an Eversor (and Death Cult Assassins) in my WH+IG army to create a refused flank with my Seraphim. Without the Assassins, my assault element is mediocre at best. In this army I have three distinct elements, a) objective management units (typically Sisters units and Sentinels), b) long-range firewpower units (Infantry Platoons, Exorcists and Retributors), and quick engage close combat units (Assassins and Canoness + Seraphim).
I deploy my Fast Attack (Canoness + Seraphim) late in the deployment after deploying a large amount of Battle Sisters and Inducted Guard (I try to encourage my opponent to spread his army to match my deployment. When I deploy my Fast Attack, I choose an extreme flank to allow a refused flank attack.When it comes to deploying my Seraphim, I choose a flank defended by infantry and deploy my Seraphim as far forward as obscuring terrain allows. Then during the Infiltration phase, I deploy my Eversor (and DCAs) on the same flank as my Seraphim.
If I lose the first turn, my opponent typically focuses his shooting on my Assassins. Since each of the 4 Assassins are an individual unit for shooting (and shooting at my Eversor forces Target Priority checks), I usually end up with a couple of DCAs and the Eversor left when the dust settles. On my turn, my flanking units move forward and my Eversor assaults. If he dies, then I don’t have to worry about Bio-Meltdown affecting my units. My DCAs (and sometimes my Seraphim) join the Assault on my next turn.
With some luck (and careful placement), I can run down several units with this flanking manuever before my opponent can react to it. Since I have as many as six separate units in close combat, I have six chances to Sweeping Advance. Few armies can protect themselves from this sort of flanking attack, especially while enduring the withering fire from my long-range shooting units (generally focusing on transports and fast moving units).
Although, like a good parent, I try to love all of my operatives equally. But the Eversor has a special place in my heart that I can’t deny. He’s just so cheap and reliable. I love first turn assaults in a shooty army and I love how reliably he devastates anything I point him at.
Next time: Death Cult Assassins…
