40K HOBBY: “HORN” Pattern Storm Raven
8 Minute Read
May 9 2010
Advertisement
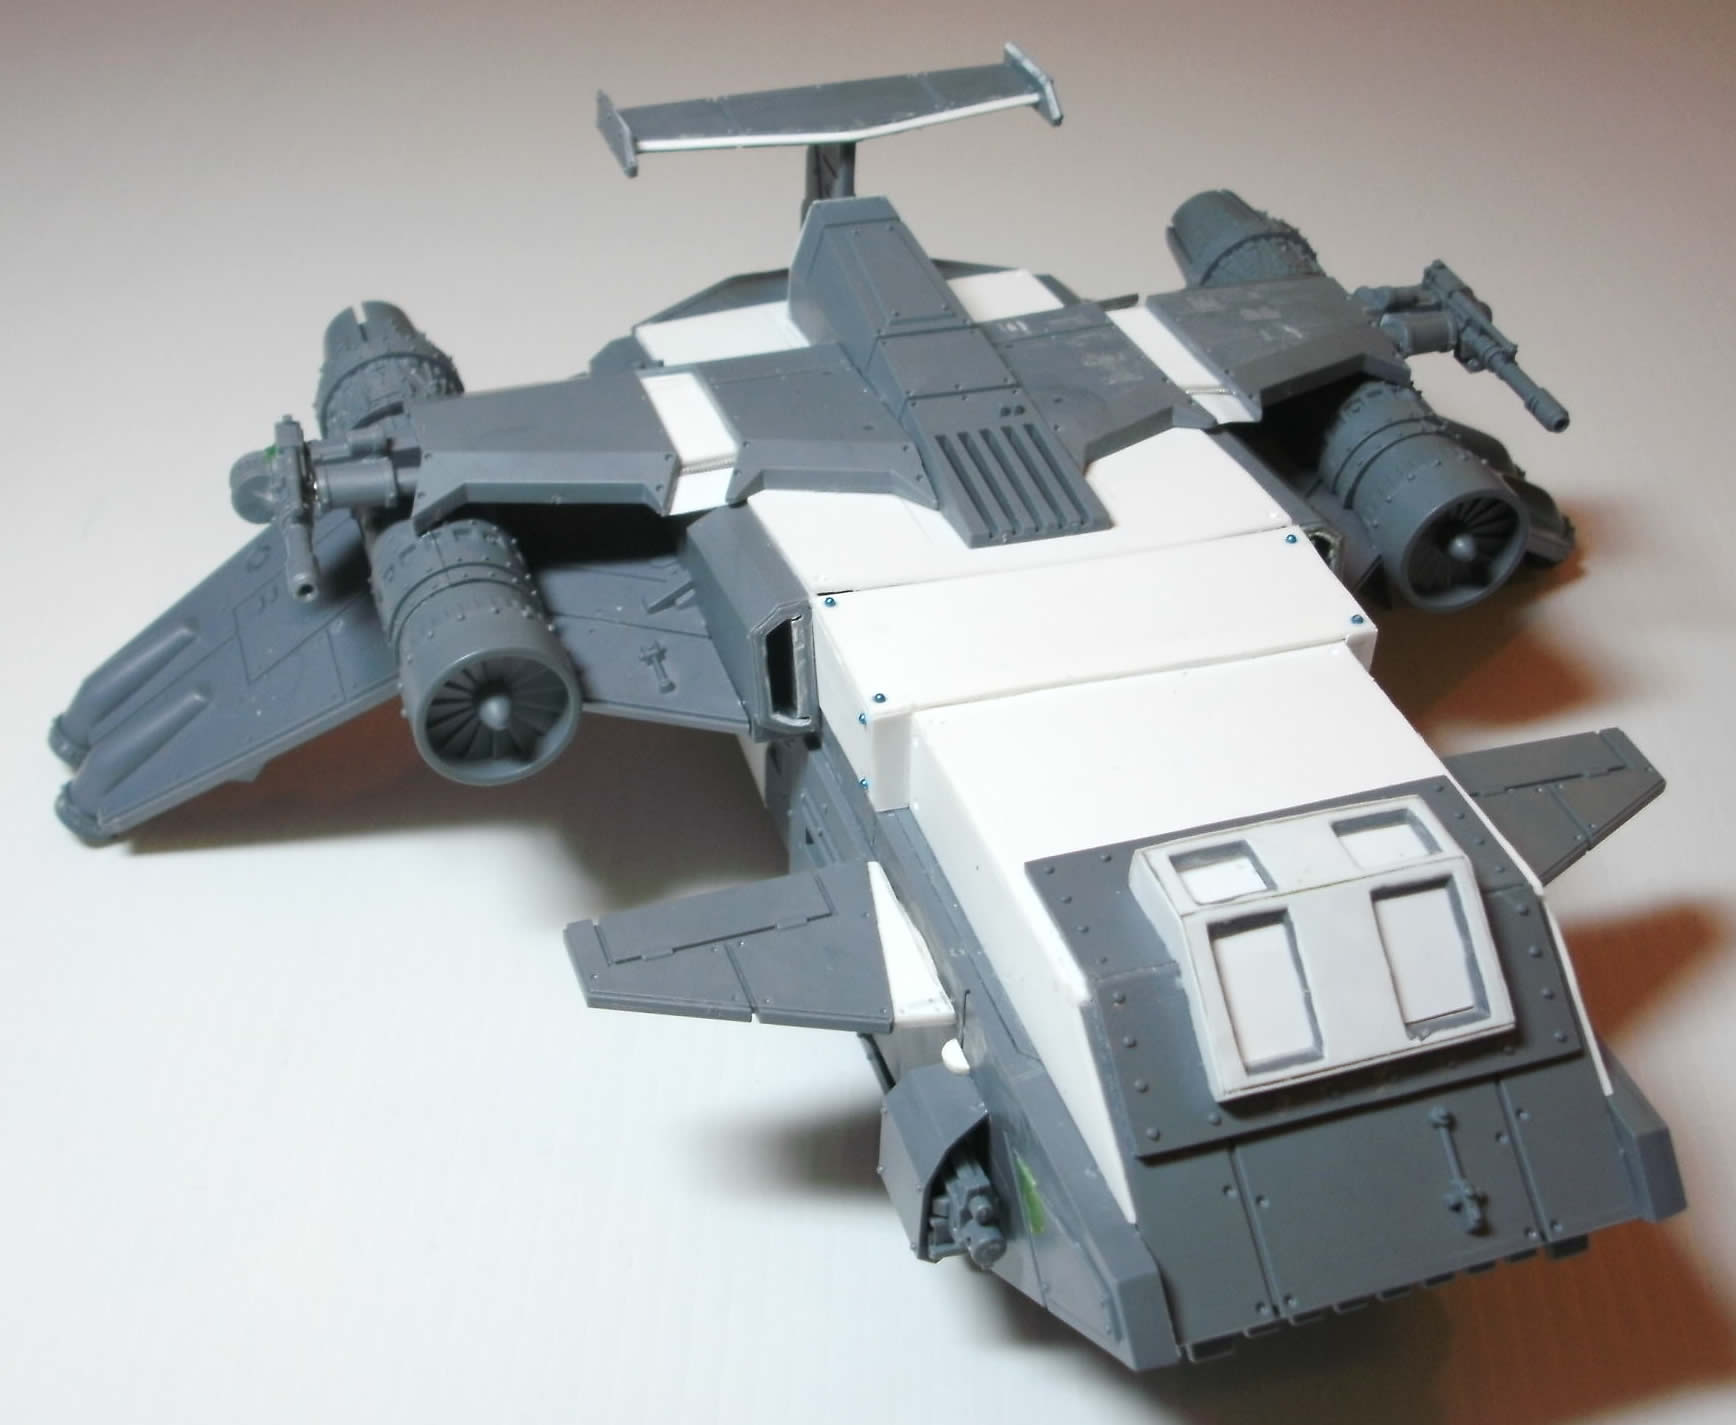
This Storm Raven model requires a little introduction to clarify a few components. My initial motivation for this project was to create a unit called a Storm Hawk. Tempus Fugitives). It is obviously inspired by the Storm Raven, but adapted to work for pre-Heresy and more importantly for Mechanicus use.
This is a custom unit that can be used within a campaign I am participating in at Warhammer World (see
This is a custom unit that can be used within a campaign I am participating in at Warhammer World (see
To slay two fiends with one sword, I chose to double-up the project as a Storm Raven, particularly with all the lovely Valkyrie conversions floating around on the Web. However, as nice as they looked, the concepts didn’t sit right with me. They just don’t look Astartes, more suited for Imperial Guard, due to the Valkyrie cockpits. I opted to base mine on the Thunderhawk STC with the major difference being the cockpit area. As a Storm Hawk, the armaments are a little different to the Raven, having Twin-linked Autocannons instead of Assault Cannons.
The build is almost wholly made from a Valkyrie. I used a few leftover bits from a Chimera for the cockpit, lots of plasticard and a bit of Cities of Death. All these extras can easily be made with plasticard or other spares you may have.
A simple reversing of the entrance ramp sets the premise for the design.
 Taking a lot of inspiration from the Thunderhawk, I planned the smaller wings to be fixed to the front. They can be attached with a pin without damaging the inside.
Lining up the pin so that it enters the small box on the interior gives it a decent depth and doesn’t mess up the insides of the model.

The wings are a bit too angled, so I added small edges of plasticard to the large end and drilled a socket for the pin.


I decided to attach the engines to the middle of the wings, but the existing model is too long. Cutting out the centre of the engine reduces the length enough to sit on the wings nicely.

Any protruding detail on this part of the wings and the notches on the engine need removing to create a flat surface for gluing.


The wing structure stayed the same as the Valkyrie, but I cut the side bars short and attached them towards the rear of the body. Planning to extend the length of the hull, I cut off the edged back of the hull.


Most of this area was bulked out with plasticard, extending the hull to the end of the wings and giving the hull more height.
I cut out the top of the nose to re-position it for more height.


The rear underside is currently empty – a perfect opportunity for Dreadnought clamps or another assault hatch if you prefer.

The cockpit is built from Chimera parts. 2 armour plates for the base.

Then using the lasgun inside panels and a lot of plasticard, I scratch build the windows to sit on the base plate.


I decided to take an easy way out of doing the Dreadnought grapples – they’re inside the ship!
Making use of a Spare Drop Pod door I ordered a while back (I’ll make a seer of me yet!), I stole the hinges to make the back of the ship look like doors. You could equally use the spare bit of casing cut out of the engines.

Using just the middle bit, I attached this to the gap in the back plate,making it appear to be a ‘hinge’ to open the back.

The Drop Pod door fortunately has two sides, so I could make 2 hinges.
I penciled in my intentions for the back of the hull…
 Happy with the design, I glued a thin sheet of plasticard onto the back and cut it to fit. Lots of Pin Vice drill holes were added to keep the plates consistant with the rest of the ship.
The Valkyrie inlet was added to the back as a spine for the tail, though I wasn’t sure if I’d put a tail on it.

Finally, more stud holes were added to the white card parts and studs glued onto the mid section.

i wasn’t sure if I liked the rear profile of the ship – the engines looked vulnerable.

Wanting to make use of the eagle shape from this Cities of Death piece, I stared at it lots. A few people told me it was too slim, but I was adamant about using it.

The obvious choice for the t-bar on the tail is the existing cross-piece from the Valkyrie kit. This will no doubt require some modification later.

The pieces pair up OK, but the overall shape is very different to the Thunderhawk design. This had to change.

Angel of the North came to mind when looking at this!

I decided to bite the bullet and add smaller support beams onto the top of the exposed engines. A couple of people gave very convincing advice, so here we go. Keeping to the Valkyrie kit, the cockpit was the next victim. I broke down the parts as so:

They positioned quite nicely against the centre inlet, but didn’t really reach far enough.

They work well with the tail mock-up too.

When something isn’t long enough… you make it longer. I cut the pieces down further.

A quick pose shows that the extra length would work well – filling the gaps with plasticard.

I didn’t go into much detail with the plasticard to join the wing plates, just flat surfaces and a line of cable.

The ends of this top wing section also have an awkward shape that needs to be filled with something – I realy don’t fancy extending it with plasticard, so aimed for a hinge similar to the Thunderhawk.
For this, I hacked apart a Chimera Dozer blade.

The hydraulic section placed into the gap worked nicely, but I needed to figure out the rest of the hinge arm.

Rather than building a fully extended arm from the support wings, reviewing the Thunderhawk design again gave me the idea of attaching guns instead. I quickly ordered some Autocannons from a Bitz site.
Please remember that this model’s armaments do not reflect the Storm Raven from Codex: Blood Angels.
The ship is armed with twin-linked Autocannons, twin-linked Heavy Bolters and 4 missiles. I decided to portray this as 4 individual weapons that share firing arcs. I made use of the Lascannon sponsons to place Heavy Bolters on the nose flanks.
The tail was redone, cutting the flaps off the tail bar and adding a strip of plasticard. The sides are the remaining plates from the very nose of the old Valkyrie cockpit.


The next exciting task will be to paint the Storm Hawk. This is the last time it will resemble anything remotely Blood Angels. Behold red primer spray!

Please, please try to build this yourself if you really want one. I don’t have time to do such commissions, but have instead taken the time to explain the whole process for you all to have a crack at it.
You can follow the Rusty Dice’s other crazy projects at Mywargame.com where he tends to blog everything he does to pre-empt the inevitable questions about how he did them.
Author: Larry Vela
Advertisement

