HOBBY: Painting Banners with Sponges
3 Minute Read
Feb 11 2013

Advertisement
Brandon here, with a short how-to on using sponges to achieve a quick but eye-catching result on your models. More after the jump!
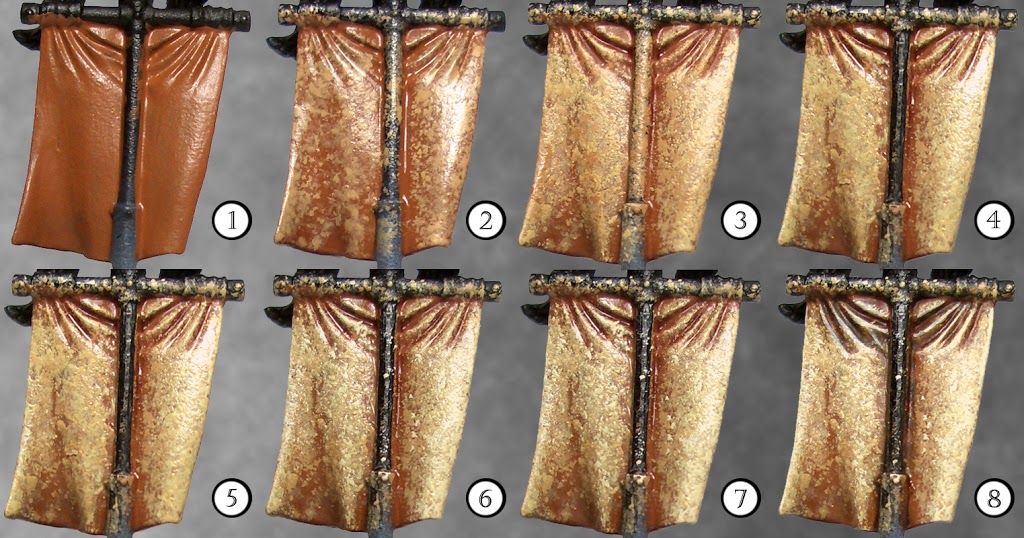
This is a simple technique that I use primarily on the backs of my banners to represent an animal hide or a wool-like material, and has a slightly textured look to it. I’ve also used the technique to paint camo cloaks, and if I ever have to paint an Imperial Guard army in greatcoats, it will be my go-to strategy for tackling the infantry. Let’s start with a paint list of what I used for the step-by-step photo below.
Black (Primer)
P3 Bootstrap Leather
VMC Iraquian Sand
GW Ceramite White
GW Devlan Mud
I also use a flow aid in the technique, to help diffuse the paint and keep the transitions moderate. My brand of choice is Liquitex, and I mix it half and half with water before application.
I use blister foam for all my sponging, so you’ll want to have several pieces on hand if you’re going to be doing a lot of spongework in a sitting. I also recommend you do this project before you go on to paint the rest of the model, as the sponging tends to get paint all around the target area.
1: Lay down a basecoat of Bootstrap Leather. Take your time, and put down 2 or three even coats, to make sure you a get a smooth even base. Let it dry completely before moving to the next step.
2: First lay down an even coat of your flow aid (optional), and then use a piece of blister foam to start sponging down a 2:1 mix of Bootstrap Leather & Iraquian Sand. Notice in my photo that the blotches will run a bit, due to the flow improver.
3: Continue building up the sponging by increasing your ratio of Iraquian Sand in the mix to 1:1 and decreasing the amount of sponging you add, paying more attention to higher areas.
4: 1:2 Bootstrap Leather:Iraquian Sand
5: Pure Iraquian Sand
6: 3:1 Iraquian Sand:Ceramite White
7: 2:1 Iraquian Sand:Ceramite White. This completes the sponging.
8: Apply a wash of Devlan Mud to the deep recesses of the area, such as folds at the top, and the area immediately around the banner pole. Finally, do a fine edge highlight of 1:1 Iraquian Sand & Ceramite White on the creases in the fabric and along some of the edges of the banner.
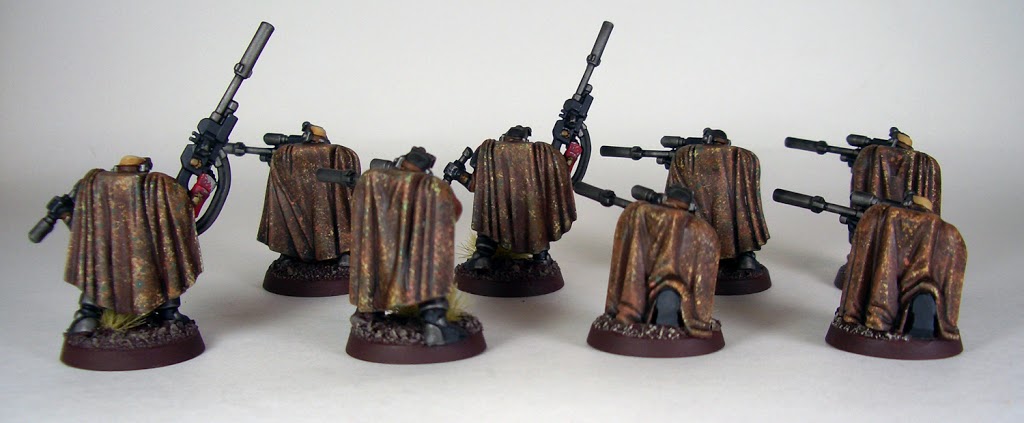
That’s all there is to it! As I said before, there’s more you can do with this than just banners; by changing my color palette to be more woodland-themed, I have used the steps above to do these scouts’ camo cloaks:
Give it a try and post your results in the lounge for everyone to see. Until next time, happy painting!
-Brandon
Author: Guest Columnist
Advertisement


