Hobby: Building the Skitarii


The Skitarii offer a brand new aesthetic and new kits to the 40k verse that bring with them a unique set of challenges. I’m going to break the kits down.. and build them!
First of all, a little background. I, Dr. Bored, have been building kits since the twilight of 3rd edition. I’ve built more Chaos Marines than I should have, and have dabbled in Imperial Guard, Dark Eldar, Eldar, Tyranids, Tau, Space Marines, Sisters of Battle, Chaos Daemons, and even Lizardmen. I love building! It’s an addiction! The whole ‘plastic crack’ phrase is so true and real to me! So, when I break these Skitarii down, know that I’m building with plenty of experience.
Now, that said, if you want to experience building these kits without any foreknowledge, to have your own adventure into the joys and frustrations of building a Skitarii force, stop reading here!!
The Skitarii are VERY detailed, and there’s a LOT of good in here, but there’s a little bit of bad too. Honestly? I wouldn’t recommend this army to a brand new builder. There are fiddly parts that are easy to mess up or break, and the potential for keying the wrong pieces together is rather high, which can lead to more frustration. In terms of frailty and complexity, I would say that they’re very similar to Dark Eldar. Just as the Dark Eldar had tiny spikes and skulls and tall banners, so too do the Skitarii have fragile antennae, long guns and limbs, and extra details that you need to be careful in positioning.
Let’s start with some tips right off the bat. I’ll organize these based on the box…
Vanguard/Rangers
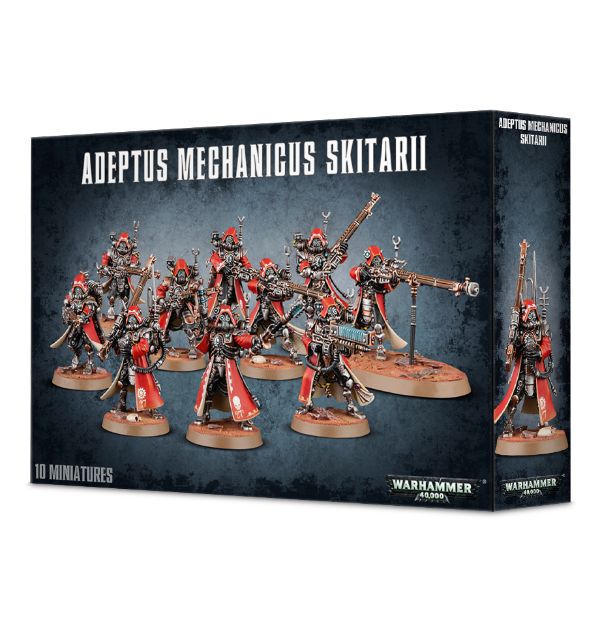
This kit is fantastic. The level of detail is phenomenal for a troop unit, and the way that the robes fit together creates a lot of depth in the chest and legs that you just don’t get with other models! They’re ripe with details, and despite the instructions suggesting otherwise, there is plenty of customization to be had.
1. When pairing up weapon arms, take a close look at the shoulder pats. The Rangers have a boxier shoulder pad while the Vanguard have a rounded shoulder pad. This should help identify which Radium Carbine or Galvanic Rifle goes to which arm.
2. Invest in some sort of putty or green stuff. Every model’s robe is made up of two parts, and that leaves a vertical line on either side where the robes meet. I’ve found that sanding doesn’t cut it, you’ll at least need some Liquid Green Stuff.
3. Each model is made up of front-robe, back-robe, and legs. Other than that, the backpacks, heads, and most weapon arms are fully interchangeable. Some weapon arms do have shapes on the inside of the arms that are supposed to match with the pipes on the side of the robes, but this alone shouldn’t dictate which arms go with which model.
4. Though there is only one special weapon in each kit, by pairing up the special weapons with different body/leg sets, you can get radically different poses, so samey-ness shouldn’t be a problem.
5. Be careful with the Transuranic Arquebus!! It’s very easy to mess up that stand, to cut it too short or to bend it badly. Do lots of dry-fitting, and I recommend the use of sticky-tack to make sure everything fits properly.
6. The best thing I can recommend with this kit is to dryfit each weapon option before you glue it down. Using Plastic Glue will also give you more time to work with each piece, and that should make the kits more solid, and easier to work with overall.
Ironstrider/Dragoon
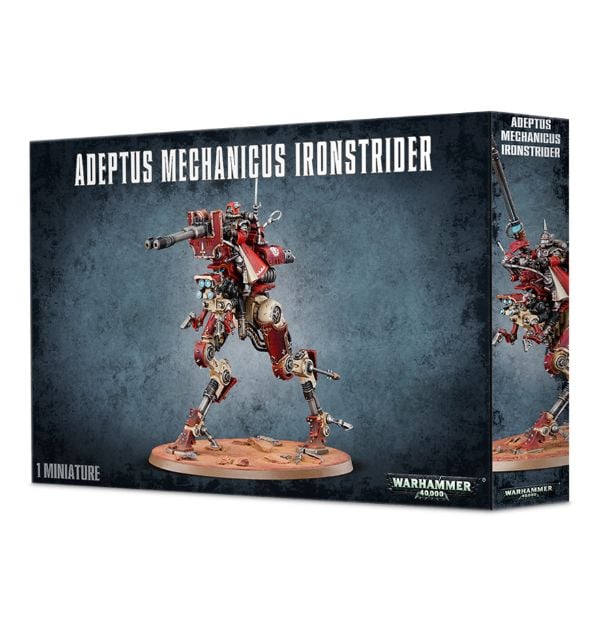
I’m not going to lie to you, this kit was frustrating, but the appearance of the final product really sold it. Yes, it’s expensive, but that’s an argument for the umpteenth other articles and topics about that. The bottom line is that the kit is beautiful, and here’s some things to keep in mind if/when you build it.
A. Take it slowly. This kit is not a Rhino that you can slap together. I recommend using plastic glue, and being sparing with it, since many pieces could end up melting into other pieces. Be careful and build this kit at a slower pace.
B. The cables on the legs are frustrating to deal with. I recommend getting a pair of tweezers or long grippers for model kits to hold pieces in place. One leg has two cables, and a third that must be attached separately between the servitor and the actual mechanical Ironstrider leg. If you have larger fingers, the best bet is using tweezers to get it into place.
C. Yes, the legs can only be positioned one of two ways, but that doesn’t mean they can’t be customized. Censors and extra details on the ankles can be positioned in different ways to create different looks, and then antennae on the top can be rotated for slightly different looks. The kit also comes with 4 Ranger heads and 1 Vanguard head that are totally interchangeable with the Vanguard/Ranger kit. If you’re going to build multiple of these, I recommend building your Vanguard/Rangers first so that you have plenty of extra heads to work with.
D. People seem to think that this kit is easy to magnetize. Yes. You can magnetize it as far as swapping the Autocannon out for the Lascannon, or the Jezzail for the Taser Lance, but trying to magnetize this kit entirely between the Dragoon and the Ballistarius is going to be a nightmare. First, the Ballistarius has the shield that holds the actual gun. This shield rests atop a very thin rail piece at the front. You could easily put a magnet in the shield to swap out the Autocannon and Lascannon, but putting a magnet in the rail to swap between the shield and the other options will be very challenging, to say the least. The rail on the Dragoon holds several screens and monitors that the shield gets in the way of, and mounting three magnets to hold all of that on that rail seems like something I just wouldn’t bother with. However, putting a magnet in the pilot’s arm to swap between the Jezzail and the Lance should be very easy, and the kit comes with a HOLSTERED Phosphor Serpenta and Jezzail, which would make it even easier to magnetize between those options!
E. A final note on customizing these kits; the little grabby t-rex arms have spikes that make them position a certain way, but these can be shaved down for additional posing. Also, the antennae on the back are designed to allow you to rotate or flip the antennae in different ways for a little bit more customization to keep the models from looking exactly the same.
Up next are the Ruststalkers and the Onager Dunecrawler, tune in next time! Also, please leave any other tips or tricks you’ve found with these kits in the comments below! Let’s help out our fellow hobbyists!


