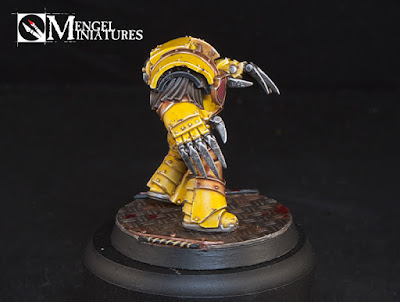
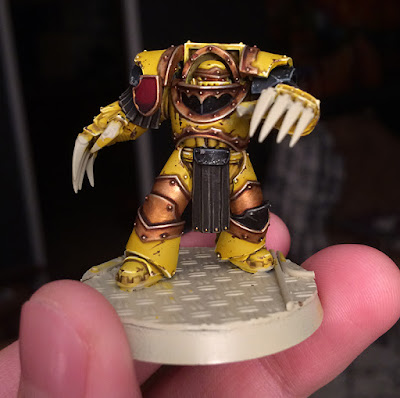
SHOWCASE TUTORIAL: Imperial Fists Cataphractii


Having a Tactical Marine under my belt I figured it was a good idea to tackle one of the other model types in the Betrayal at Calth boxset.
After debating between one of the characters, the contemptor or the cataphracti, the terminator won out in the end.
I have always loved the look of the cataphracti terminators, so I was eager to try to paint one. Now, they have a lot more detail on them then the standard marines so I had to decide how I was going to paint the different areas of it.
Luckily for me Forge World has done some amazing color plates for the Imperial Fists, including a few different versions of the terminators. I really wanted my models to scream Imperial Fists, so the almost all black one was a no go.
I really like how they broke down the blacks and yellows, and the fact that they still included gold trim. I knew going into this that making the gold look good on top of the yellow was going to be a challenge.
I was right too, and had to try out a few different things to get the shade of gold I wanted. That’s part of the importance of doing test models like this. I’m glad it all turned out looking good in the end, but there was no guarantee of that. It would have been very discouraging if I had painted all five at once and then had the gold end up looking horrible.
This way I got to work out all of the kinks before moving onto the rest of the army. My next model will probably be the dreadnought, so I can work out how to paint larger models with this technique. The obvious issue is using the glaze on such large and flat areas. My first thought is to apply it with an airbrush. I will see how that goes. I’m glad that all of the rumors about Lamenters Yellow being discontinued are false. Instead it is moving to online only, which I am fine with. It just means I will need to think ahead a little bit when my current pot starts running low. Having said that, I may pick up an extra one in store before it gets sent back just to be safe.
Tutorial
A lot of how I painted the Terminator was the same as the Tactical Marine, so I didn’t replicate those parts of the tutorial. You can find the original tutorial here.
Black
Step 1.
Paint the black exactly the same as I did for the Tactical Marine. Once that is done I added some weathering to help tie it into the model more. The black areas on the Terminator are also larger then what was on the marine. To do this I just replicated my weathering technique from the yellow armor, but switched out the Rhinox Hide for Leadbelcher. I mostly let the foam do the work and didn’t go back in with a brush except for in a few areas. You need to be extra careful not to get anything on the yellow.
The Leather
Step 1 & 2.
Base coat all of the leather areas with Rhinox Hide and then wash it with Nuln Oil.
Step 3 & 4.
I then highlighted the edges by mixing in a little Ushabti Bone into the Rhinox Hide. I did this in two stages, making the second highlight lighter and more refined then the first. This meant mostly keeping the second highlight towards the bottoms of the straps.
Step 5.
Once I was done I wasn’t happy with how it looked. The leather looked too cold next to the warm yellow. Taking a shot in the dark I grabbed my pot of Seraphim Sepia and gave all of the brown areas a quick glaze. The warm yellow/orange of the shade did a good job of bringing the hue closer to what I wanted and made the contrast less stark. Since this is a glaze you will want to make sure that you cover all of it, you don’t wan’t the shade to just pool into the recessed like you normally do with them. You are aiming for more or an all over hue change.
The Gold
Step 1.
All of the areas that were going to be gold were given a solid coat of Retributor Gold.
Step 2.
This was then washed with Reikland Fleshshade.
Step 3.
I then layered Auric Armor Gold on top of it, leaving the shaded areas in the crevices.
Step 4 & 5.
I then highlighted it with Liberator Gold, followed by a much finer highlight of Runefang Steel. Originally this was going to be it, but when I looked at the finished model something seemed off. The gold seemed to “rosey” when compared to the yellow. It had an almost pink quality to it, so I kept on going.
Step 6.
Hoping that my trick from the leather would work here to I gave all of the gold areas a glaze with Seraphim Sepia. I ended up having to do two layers of this to get the hue I wanted.
Step 7.
I then went back with Runefang Steel and picked out some highlights again. I also wanted it to look battle worn, so I replicated my weathering technique on the gold. This time I used Runefang Steel to represent scuffs and scratches. It’s subtle but I think it turned out well. You can see I also did this on the silver areas, mostly his lightning claws. The rest of the silver was painted the same as with the regular marine, except the claws also got a wash of Nuln Oil to make them a little darker before highlighting.
The Eyes
The eyes were actually painted the same as the marine’s. but I just did them a little earlier. You can see in this picture that the leather isn’t even done yet. I painted them while I was waiting for some of the brown to dry. I had to make sure I got them done before the gold since they are so recessed. Otherwise I would run the risk of getting a bunch of red on the gold of his brow.
And he’s done! The red on his shield was just Mephiston Red, shaded with Nuln Oil, layered with Khorne Red (because I decided I wanted a darker red) and then highlighted by mixing in Ushabti Bone. Everything else that I didn’t cover here was done the same as in my last tutorial.
I hope that tutorial was useful, you can see a 360° video of the finished model below.
Tyler is a life long painter and hobbyist and took home his first Golden Demon award at the 2012 Chicago Games Day with a follow up at the 2013 North American Games Day. More of his work can be found at his blog, Mengel Miniatures.


